An Affinity with Photoblog
- Gethin Thomas
- Feb 11, 2021
- 5 min read
Originally published on Photoblog by Gethin Thomas FEBRUARY. 11, 2021
Affinity - a natural liking for or attraction to a person, thing, idea, etc. a person, thing, idea, etc., for which such a natural liking or attraction is felt. Inherent likeness or agreement; close resemblance or connection.
Such as they are, here are the steps to producing a porcelain blue image in Affinity. Don't sue me if it doesn't work. At the very least it gives you the steps to play around with your own creativity and make something a bit different.
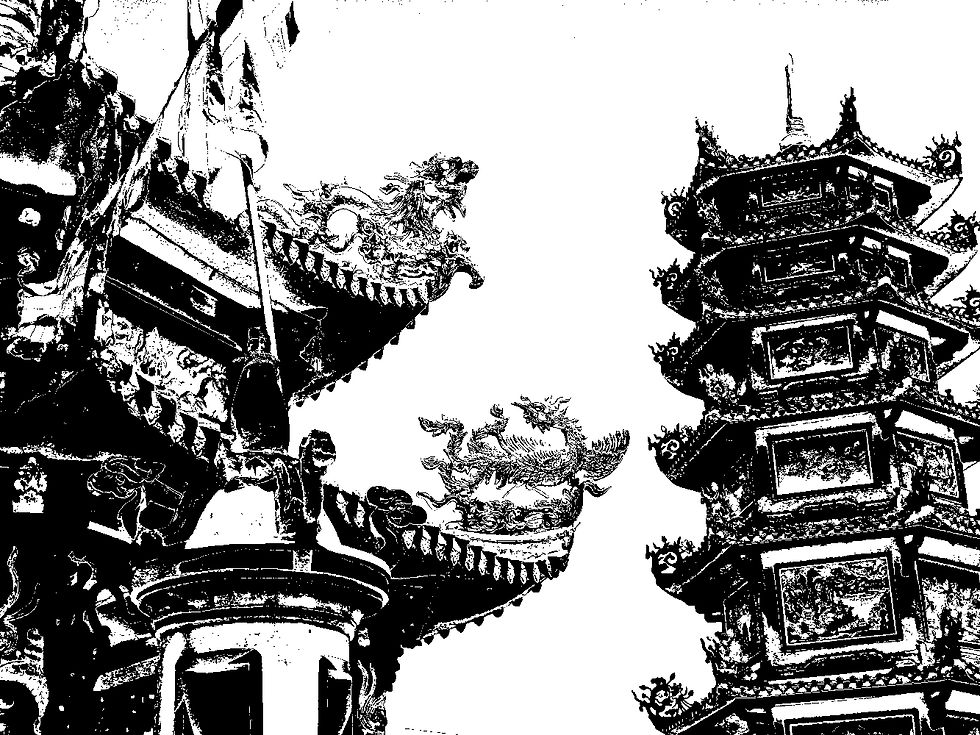
Choose a picture that would make a good porcelain image. As the blue and white origin of this effect was on crockery from China using a striking Cobalt Blue and milky blue white glaze with stereotypical scenes of what struck the audience of the time as oriental. Think in terms of Chinese watercolour subjects or Japanese landscapes as these are well suited to the effect. If you don't have pagodas or actual far east landscapes think of flowers, foliage, and plants like bamboo or grasses. It needs to be an image that can be high contrasted into strict black and white with no greys. It's important to remove all grey.

First I placed the photo in Develop Persona where I played with all the Basic sliders increasing exposure, blackpoint, contrast, clarity and shadows, and reducing the highlights so that the dragons against the sky were still visible. You are trying to draw out all the graphic elements to make them more extreme. Then Develop, leaving the image in Photo Persona.

In Photo Persona, show the layers tab. Control J to duplicate the image. In the duplicate top layer hit Live Filters and choose High Pass. I am giving the measures I used but they may vary for your image. Play around with it. Radius 42.4 and in Blend Mode choose Hard Mix. This gives the result below. So you now have all the basic colours in what I call a screen print effect.

Click on the duplicate image in layers and using the adjustments tab hit HSL and pick default. This brings up the colour wheel. Choosing each colour in turn either max the luminosity up or down to suit your image. This has the effect of turning each colour either black or white. See below. I actually turned the red and cyan to white and all the rest to black. Turning the cyan to white gave a pure white sky. On this occasion I was left with some tiny black speckles along the top. I'll deal with these at the end.
Once you have the black image the difficult part is over. What you are in essence now aiming for is three layers. A blue cut out top layer with transparent white. An identical blue cut out layer beneath that merged with a white background. A base layer that you fill with porcelain white.
How to do this?
1. Start with your black image flattened in case any unneeded layers are still present. Flatten is in the Document dropdown menu.
2. Using Selection Brush in a small mode just select any solid piece of black, then in Select dropdown, click Select sampled colour at 100%. Make sure your marching ants are marching around the black, if not invert the pixel selection in Select dropdown, so they are.
3. Control J to copy the black cut out area.
4. While still selected on the copy layer Edit dropdown-Fill-custom colour. Click the default white to bring up the colour choice window. This is where you choose your fill colour to change the black to Cobalt blue. I used R-0 G-3 and B-175, again you can play around.
5. Still selected, control J to copy the blue cut out layer.
6. You now have three layers, two blue identical cut outs and one base black and white.
7. Click on the base layer, Select dropdown-deselect the marching ants, and control J. Fill both of these layers with porcelain white by clicking on them in turn and in Edit dropdown-Fill- Custom colour. I used R-242 G-255 and B-255
8. You now have four layers, two of each. Merge the two middle layers into one by clicking on the lower blue cut out right clicking it and choosing merge down, to the top white layer below.
9. Now you have your three layers. Blue cut out at the top, blue and white in the middle and white below.

10. With the middle blue and white layer highlighted. Hit Live Filters and choose Gaussian Blur. Whack it up to 100% or less if you prefer. This is how you get the blue glaze bleeding into the white glaze, effect. Your top blue layer is still sharp. In this particular image I had to use a further step which may not be necessary depending on the amount of detail in your image. In this image there are quite a lot of fine white areas which have gone very blue because of the blur.
11. With the Erase Brush on 25% opacity click around the overly blue areas. Don't forget you are doing this on the middle layer so the top blue layer is not affected. Because you are erasing the middle layer, the white on the bottom layer appears and the blue in the top layer remains, this is really neat and like magic you get the image below this one where the detail returns as much or as little as you like. Clicking around controls how much detail returns.

So here is your nearly final image. But we still have those tiny blue speckles along the top of the frame.

Three steps left as we now move to the top blue cutout. The top cutout seemed to me a bit sharp and not very soft glaze like, so while on the top layer, hit Live Filters and Gaussian Blur again. But this time you want a very subtle blur to soften the edges. Again play around, I set it to 0.2 px which is very slight. To add more depth I also, using the adjustments tab clicked HSL again and this time just moved the luminosity down slightly to darken the blue, this is optional. I thought it gave two different blues and might make a difference.
Last step, don't forget we are on the top layer and the blue speckles are on a transparent background with the white showing from underneath. So using the Erase Brush tool this time on 100% just erase any speckles or even any details you don't like.
Flatten image and save.

If you have any problems with these instructions and feel I have made a mistake somewhere or think you can improve it in any way please let me know.
Comments